MacOS Remote Support Agent
Generation provides remote and onsite IT support and cybersecurity services to both MacOS and Windows laptops. We currently employ and industry standard software solution, Connectwise Automate.
Our remote agent allows us to remote into our clients machines when they provide consent. Additionally, our agent provides inventory and health information to allow put us in a more proactive place.
Typically, we deploy our agent to windows machines using Group Policy or Intune Endpoint Manager.
For MacOS, we can deploy the client through an MDM (JAMF or Intune). However, MacOS security settings require us to perform these additional steps the first time we onboard a client or machine.
Request a Quote Now
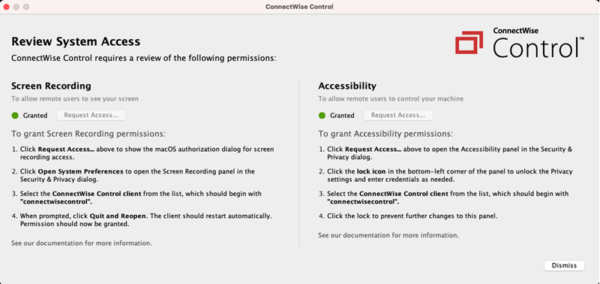
Allowing screen recording and accessibility access
These are the final steps happen when a technician first connects to your machine. In order to control your machine, you’ll need to enable a couple of settings in System Preferences. A large prompt will appear and guide you through the configuration.
- Have a technician connect to your machine
- Upon connection, you’ll see a large prompt that will guide you through the configuration.
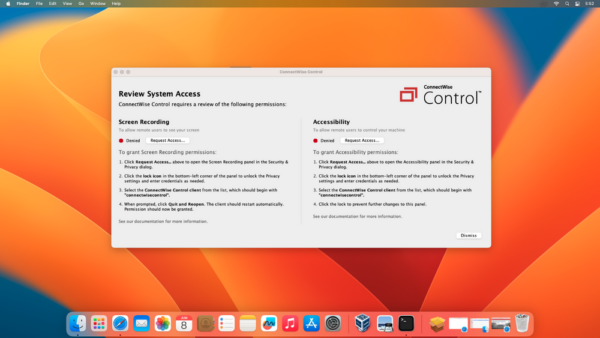
- Allow Screen Recording access
- In the Screen Recording section of the large prompt, click Request Access.
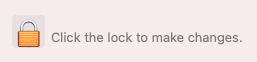
Note: Earlier versions of macOS require you to click the dialog’s padlock icon before editing the Privacy settings.
4. Next, click the toggle switch for the ScreenConnect client. The client name begins with “connectwisecontrol”.
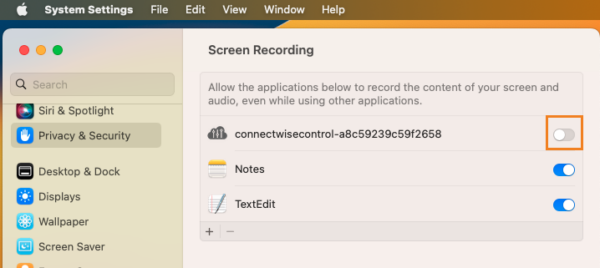
If required, enter a username and password to allow your changes.
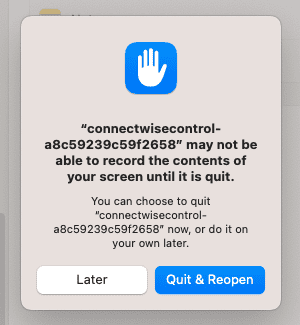
5. Next, a new message appears with the option to Quit & Reopen. Click Quit & Reopen and the client will automatically restart.
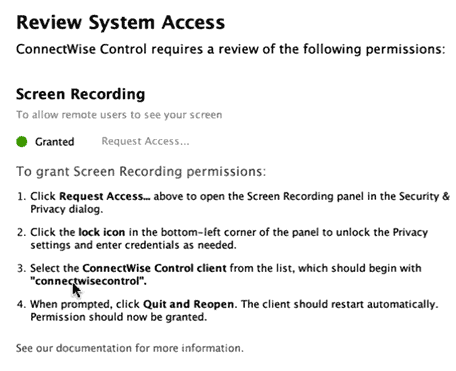
6. Once the client reopens and the large ScreenConnect prompt returns, you should see that Screen Recording access is granted.
Allow accessibility access
- Return to the large Review System Access window. In the Accessibility section of the window, click Request Access.
- Note: Earlier versions of macOS require you to click the dialog’s padlock icon before editing the Privacy settings.
3. Next, click the “connectwisecontrol” switch.
When you have finished, click the lock again to prevent further changes, and close the window.
For macOS Big Sur
If you don’t see the “connectwisecontrol” client, add it by clicking the plus (+) icon at the bottom of the program list. Navigate to /opt/connectwisecontrol-xxxxxxx and select the client there.
Note: the directory/opt/ is a hidden folder. To access it:
- Click the (+) icon to open Finder.
- Press Command+Shift+G.
- In the text field, enter /usr/local/opt
- Open the /opt/ directory and you should see the “connectwisecontrol” client. Click on it to add it to the program list, and click on the checkbox to enable it.
4. Verify your changes in the Review Access window
You should see a green circle and a Granted status for both Screen Recording and Accessibility.
A technician should now have remote control over the macOS device.